PROJECT PLAN OVERVIEW
Step One: Explore
To figure out which project you will work on...
- Login into Schoology, open our CMA Rotation guide and see which engagement you will start on
- Begin to explore the Get Inspired Tabs to decide what you will do for your project during this engagement
- Use the Get Inspired Page to directly access Learning Launchers related to your topic
Step Two: Setup Your Project Planner
One partner should login to Schoology
In your google drive, on your newly named Project Planner, click share and add your partner's email address and mine [email protected]
- Click on the Engagement # assignment and click on "Click here"
- Copy the Project Planner to your google drive (Rename Project # Name & Name)
In your google drive, on your newly named Project Planner, click share and add your partner's email address and mine [email protected]
Step Three: Reflect on Your Exploration
Answer the questions on the Explore page in your Project Planner. This will help you with the next step.

Step Four: Create a SMART Goal
Return to your Project Planner (either through your google drive or through the link you posted on Schooology) and create a SMART Goal for your project. Forgot what a SMART goal is? See below for more info
Sample SMART GoalIn the next two weeks we will use Google Sites to help us learn how to build our own personal websites. We will then successfully create a website of our choice and use it for something we're interested in (a hobby/fundraiser, etc.) outside of class. We will measure our success by publishing and presenting our website.
|
|
Step Five: Work Days and Reflection!
|
During the next few days you will have time to work on your project.
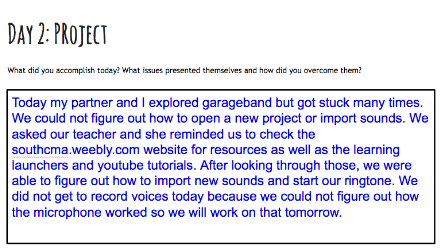
During the last five minutes of each class period, you and your partner should reflect on
|
|
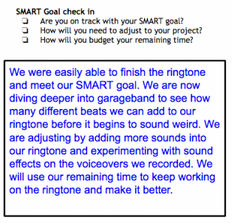
SMART Goal Check-Ins
|
During one of these project work days you will check back on your SMART Goal and how your project is going. Be sure to reflect on the questions.
|
Step Six: Presentation
Ways to Display Your Final Product
While we want you to be creative with your presentation, there still are some guidelines we want to stick to. Don't worry though. These guidelines won't limit you from being your creative self!
While we want you to be creative with your presentation, there still are some guidelines we want to stick to. Don't worry though. These guidelines won't limit you from being your creative self!
- Please limit your presentation to no more than three to four minutes.
- Both partners should take an active role in the presentation.
- Practice and proofread your work! There is nothing worse than a great presentation filled with misspelled words.
- Remember that we value quality over quantity. When sharing topics such as your challenges and successes, it's better to focus on just two or three instead of listing ten different things. It is also very helpful to include a picture for each topic you cover.
- Your presentation should cover the following topics (and more if you choose):
- Your SMART Goal
- How your project connects to the outside world
- Some challenges you faced (2 or 3)
- A few specific things you're proud of (2 or 3)
- Your Final Product (See below for more information)
|
|
Here is a template that you may use to help you build your presentation. There are helpful tips and tricks to help guide you in the process. Or branch out and try other presentation tools (Animoto, Prezi, etc.)! Try slidescarnival for different, stylish templates.
|
